When designing the
floor plan, I allowed enough space to build a simple L-shaped staircase in the corner of the barn. Despite my compulsive tendency to check my calculations repeatedly, somehow I made a critical error- When it came time to build the staircase, I didn't have the space needed and didn't want to cut through floor joists to make up the deficit. To further complicate the design, I needed the steps to move away from the wall to allow adequate headroom when you reach the top landing (where the arched ceiling meets the knee wall). So, my original design was thrown out and I started sketching layouts that might fit in the space, meet building code requirements, and satisfy the headroom issues at the top landing. After a couple days of drawing various scenarios, the only good way to solve both problems seemed to be a winding staircase with a dual radius. A sharp curve near the bottom would turn the corner in the least amount of linear space and a more gradual sweep along the upper section would gradually drift away from the wall to provide the needed headroom at the top. But how to build it?

Conventional
stair building methods (using stringers) wouldn't work with my curved design, so I decided to support the staircase with a
stud wall on the inside and
ledger boards, attached to the building's wall, on the outside. I established the path of the steps by tracing out the radii on pieces of plywood, then laminating them to some treated boards that would form the sill plate of the stud wall. This assembly, which looked strikingly similar to the Nike Swoosh (maybe my subconscious would rather be out
trail running...), was anchored to the foundation with concrete screws.

I'm one of the few people that goes
shopping at the dump. Last summer, I amassed a
sizable collection of reclaimed lumber by scrounging through the demolition pile at our local landfill. Most of what I usually find are shorter length boards perfect for a project like this one, so I was able to frame almost the entire staircase using somebody
else's trash.

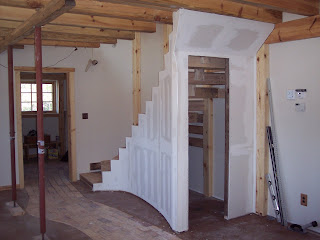
I needed to terminate my
stud wall before reaching the top, as it was encroaching on the yellow brick road below. So I cut stringers to support the final two steps. This also allowed enough headroom to frame in a standard sized door so we can use the area underneath the steps for a storage closet.

I had enough cutoffs from my previous drywalling projects to skin the whole
stud wall without having to buy any new material. Here is a sneak peek at the roughed-in stairs. Eventually I will install thick pine slabs for the treads and build a nice curving handrail and skirting, but for now it is
usable- no more ladder climbing to get to the second story!

 I'm one of the few people that goes shopping at the dump. Last summer, I amassed a sizable collection of reclaimed lumber by scrounging through the demolition pile at our local landfill. Most of what I usually find are shorter length boards perfect for a project like this one, so I was able to frame almost the entire staircase using somebody else's trash.
3 comments:
WoW! That is really cool. I think now that you have it drywalled and still open, I would cut in a bunch of boxes for shelving and displays, since it is such a unique staircase.
You could backlight a couple of them and have a night light.
Awesome! That's a very cool staircase.
We wanted to have built-in shelving, but my framing method on the curved wall only leaves about 6 inches between studs...not much left to work with, but I have some ideas.
Post a Comment