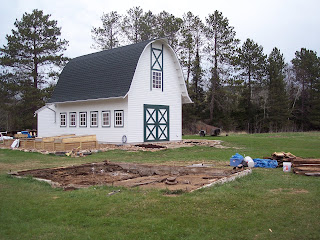
With showers in the forecast, I installed the remainder of the rainwater collection system so we could see it in action. As I worked on this project last summer, I was stuck with the dilemma of how to divert the snow melt away from the rain barrels during the winter months (there are several diverters on the market, but they are expensive and none of them were compatible with my design or our over sized classic round downspouts). But while browsing at Menards recently, I found some flexible downspout adapters and knew they would do the trick. They were only $7 each, so I got 4 of them and went to work. First, I dug a trench along the foundation wall and buried a section of 3" DWV pipe with inlet stub outs at each rain barrel location. The outlet of this pipe terminated at grade (in the forefront of the photo below) and was covered with a cap that I drilled several small holes in. Then I installed the Galvalume gutter downspouts to the walls of the barn, terminating each one a foot or so above the height of the rain barrel. A white flexible downspout adapter was then attached to each gutter downspout and bent in the direction of the rain barrel inlet. In the Fall, I can simply extend the flexible adapter down to the in-ground drainpipe stub out to divert the snow melt around the rain barrel and away from the barn foundation.

The next photo shows the two collection barrels on the south side. Holes were tapped on the bottom of each and fitted with 2" irrigation pipe and shutoff valves. Each barrel is plumbed in series to a common irrigation pipe that travels around the perimeter of the building (you can see the black pipe on the ground between the two barrels, which will eventually be covered with wood chip mulch). Eventually this "trunk" line will extend about 100 feet towards our vegetable garden and connect with larger capacity storage tanks, but I cannot complete that until we finish some site excavation this summer. So just to get the system up and running, I setup the storage tanks nearby and connected them to the rain barrels with an ordinary garden hose. This was done by tapping a hose bib into the bottom of one of the rain barrels and running a garden hose from it...

...to the storage tanks about 20 feet away, as shown below. The garden hose was adapted back to the 2" irrigation pipe fittings which connect the two large storage tanks to one another. These storage tanks are 250 gallons each, so together with the four collector barrels we have about 700 gallons of capacity. There is room on the stand for a third tank in case we want more capacity. The vertical section of pipe to the right of the barrel is the overflow for the entire system- when the water level reaches max capacity, it can spill out of the vertical pipe and drain back into the ground. It had already rained for awhile when this photo was taken, and you can see the water level rising (it had collected 200 gallons in a short time).

Here is the south view of the system. There are two more rain barrels on the north side of the barn, connected to these via the 2" irrigation pipe. Since I installed all of the rain barrels and the storage tanks at the same elevation, the entire system will fill and discharge at the same rate, using gravity. No well, no pump, no electricity required- just rainfall and gravity!

When building the gardens last summer, I installed a branch line that tee'd off the irrigation pipe with a stub out terminating inside each raised bed garden. With the system now ready for water, I clamped hose bibs to each stub out and laid down a short length of soaker hose. Our gardens can be watered anytime with a just twist of the hand valve :)

I will still need to cover the large storage tanks to protect them from sunlight (which can allow algae growth), but for now we can see the system works. The rain barrels are opaque, so they will not need to be covered. Since I often see single 55 gallon rain barrels advertised for over $100 each, I am happy to say our entire system only cost about $400, which includes all 6 of the recycled tanks and barrels (bought off Craigslist), and all the pipe fittings, clamps, valves and paint. For another $50, we can add another large storage tank and have about 1000 gallons of total capacity. I built this system around the irrigation pipe because I had most of what I needed lying in the field from the previous owners. But the fittings, clamps and valves for this large pipe got to be very expensive and I could've simplified the system and reduced the price by about 1/3 by designing it differently...ahhh, the cost of R&D!
 The next photo shows the two collection barrels on the south side. Holes were tapped on the bottom of each and fitted with 2" irrigation pipe and shutoff valves. Each barrel is plumbed in series to a common irrigation pipe that travels around the perimeter of the building (you can see the black pipe on the ground between the two barrels, which will eventually be covered with wood chip mulch). Eventually this "trunk" line will extend about 100 feet towards our vegetable garden and connect with larger capacity storage tanks, but I cannot complete that until we finish some site excavation this summer. So just to get the system up and running, I setup the storage tanks nearby and connected them to the rain barrels with an ordinary garden hose. This was done by tapping a hose bib into the bottom of one of the rain barrels and running a garden hose from it...
 When building the gardens last summer, I installed a branch line that tee'd off the irrigation pipe with a stub out terminating inside each raised bed garden. With the system now ready for water, I clamped hose bibs to each stub out and laid down a short length of soaker hose. Our gardens can be watered anytime with a just twist of the hand valve :)
 I will still need to cover the large storage tanks to protect them from sunlight (which can allow algae growth), but for now we can see the system works. The rain barrels are opaque, so they will not need to be covered. Since I often see single 55 gallon rain barrels advertised for over $100 each, I am happy to say our entire system only cost about $400, which includes all 6 of the recycled tanks and barrels (bought off Craigslist), and all the pipe fittings, clamps, valves and paint. For another $50, we can add another large storage tank and have about 1000 gallons of total capacity. I built this system around the irrigation pipe because I had most of what I needed lying in the field from the previous owners. But the fittings, clamps and valves for this large pipe got to be very expensive and I could've simplified the system and reduced the price by about 1/3 by designing it differently...ahhh, the cost of R&D!

 Getting the lay of the land.
 Here's Lisa teaching them what a door is all about...
 But you know how kids are- they insisted on doing it "their way":
 Finally...they figured it out on their own.


 By the end of day 2, only the brittle skeleton remained...


