 Happy Thanksgiving.
Saturday, November 24, 2007
Wednesday, November 21, 2007
Now for the really hard part. Back in September, I had a hard time figuring out how to frame the short walkway that connects the silo with the barn roof. I thought my head was going to explode, but eventually I worked through it and it turned out well. Now came the time to flash and roof it. Again, I was stumped, and the problem brought me closer to a complete meltdown than I care to admit. Since there was no time to dwell on things (winter should be here already, so I am working on borrowed time as it is...), I kept installing the other sections of the roof while researching the details of the silo walkway. Eventually, I developed a plan which started by flashing the entire walkway with short overlapping pieces of galvanized steel- essentially, this was a custom-built valley and sidewall detail, because such curved pieces could not be purchased anywhere. I continued the flashing all the way down the barn-silo intersection all the way to the eave of the barn roof. I also added pieces of Flexwrap at the ridge and along the silo's wall intersection to act as counterflashing (since the silo won't be covered with stucco until next year).


Next, I traced out the curved pattern of the silo walkway's roof onto plastic sheeting, then transferred this pattern to the shingle sheets. I added a couple of inches along each edge, then cut the panels and bent the edges up so that they could be tucked under the shingles of the barn roof.
 The end result is shown in the closeup of the silo walkway below. You can see the piece of Flexwrap at the ridge (over the flashing but under the metal shingles).
 With my dad's help, the remaining shingles were installed on the barn roof, overlapping the bent-up edges of the silo walkway pieces. The end result looks very clean and will be very waterproof.

Friday, November 16, 2007
Fortunately, the weather has been cooperating enough for me to push on. A little snow, but generally warm enough to keep it at bay. The arched roof profile continues to make an easy job not so easy. Installing the trim was brutal and consumed a couple days alone. I made kerf cuts every 8" or so along all the trim lengths to get the rigid pieces to bend around the curve. Making the cuts was simple, but putting these pieces up on the roof edge was sketchy. The safety harness system is priceless!
 The roofing is not asphalt. These are actually metal shingles made from sheets of recycled-content steel. The galvanized pieces are stamped with a "shingle" profile, then covered with stone coating to protect the surface and provide a traditional shingle-style appearance. All I have to do is snap it in place and fasten to the roof with screws that get concealed by the next overlapping course of panels. This is a lifetime roof- which is good for environmental reasons and great because I should never need to go back up there to replace it!
 How many products come with a 50 year warranty? This one does!

Sunday, November 11, 2007
 A couple of light snowfalls have left a dusting on the ground and a slick coating on the ladders and scaffolding. The deer hunters are thrilled to have their "tracking snow". I'm not a deer hunter. I'm not thrilled. I'll keep working on the roof because it must get done if I want to continue with the project over the winter (I can't insulate the interior if the roof is not watertight- it would be too risky). While this is no fun at all, I figure the alternative (finding some mindless, low-paying job while I wait for Spring to arrive) is worse.
 PLEEEEEZE, bring the sun back!
Monday, November 05, 2007
In the last few days of nice weather, I used every available minute of daylight...
 and several hours under the night lights...
 To get it done. I finished touching up the last of the trim as darkness approached and the storm clouds threatened on the horizon. This morning brought cold, wind, plus our first dusting of snow on the ground- winter is setting in!
 Now we need to put a roof on this thing....
Thursday, November 01, 2007
With the temps hanging in the 40s during the day, the opportunity to finish siding and painting the barn is still there. With the help of my mom, dad, sister and Lisa, we've been pushing to get it done.
 Here I am, painting "Minnesota syle"- sporting a jacket, hat and gloves.
 The gable ends of the barn took considerable time, as each piece of siding had to be precisely scribed and cut to fit tight along the curved roofline. About every fourth course also had to be notched to go around the lookouts. Barnbuilding is slow work (how did they do this a century ago???)

Monday, October 29, 2007
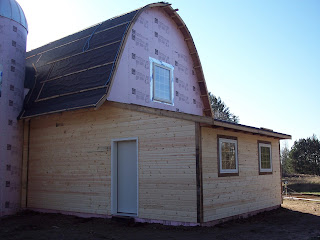
Time to cover up the pretty pink barn. I started by building a faux door for the front. Eventually, I will add the hinges and latch hardware from the original barn. But for now, there are more pressing things to be working on.
 The siding is dutchlap pine, purchased from a local sawmill who custom-planed it to match the siding on the other barn we have. This is the only wood in the barn that is not salvaged or FSC certified (because I was not able to find FSC certified siding in the style we wanted), but at least it is locally sourced. I made all of the window, door and corner trim from the salvaged roof boards that we removed from the old barn when it was deconstructed.
 With Lisa's help, we also put the remaining windows into the silo.
 And the Therma-Tru entry door went in as well.

Friday, October 19, 2007

 Windows. I shopped extensively for windows last Spring. I wanted the most energy-efficient glazing possible, without sacrificing the rustic, barn-like aesthetic. I wanted to buy local. I wanted to support a company who supports greenbuilding. Like everything else going on, in, or under this structure, I wanted a product that would survive the test of time (even if global warming takes us all out first!). Lisa and I visited H-Window in June, a small manufacturer in Ashland, Wisconsin. We were both sold on them right away, despite blowing the budget right out of the water.
So here they are. We still need to trim them out and install the exterior 'grills' that will make them look more authentic, but at least they are all safely installed in their new home!
Windows. I shopped extensively for windows last Spring. I wanted the most energy-efficient glazing possible, without sacrificing the rustic, barn-like aesthetic. I wanted to buy local. I wanted to support a company who supports greenbuilding. Like everything else going on, in, or under this structure, I wanted a product that would survive the test of time (even if global warming takes us all out first!). Lisa and I visited H-Window in June, a small manufacturer in Ashland, Wisconsin. We were both sold on them right away, despite blowing the budget right out of the water.
So here they are. We still need to trim them out and install the exterior 'grills' that will make them look more authentic, but at least they are all safely installed in their new home!
Thursday, October 18, 2007
Two days, four people, six sets of scaffolding, nine ladders, and one 'priceless' waterproofed roof...


 Here, I spent the better part of a day just waterproofing the arched entryway between the barn and silo with pieces of WeatherGuard. Because of the cooler temps, each piece had to be warmed up with a heat gun to get it to adhere to the roof.


 Here, I spent the better part of a day just waterproofing the arched entryway between the barn and silo with pieces of WeatherGuard. Because of the cooler temps, each piece had to be warmed up with a heat gun to get it to adhere to the roof.
Friday, October 12, 2007


Friday, October 05, 2007


Tuesday, October 02, 2007
Keith came back with his skidsteer and a couple of guys to finish the foundation work. After excavating down to the bottom of the slab, draintile was put in around the entire perimeter.
 Multi-tasking: We kept working on the roof while they were digging below.

 Multi-tasking: We kept working on the roof while they were digging below.

Perimeter insulation was installed over the draintile, then covered with dirt. This will keep the foundation warm and dry year round....

Since all the backfill for the foundation work has been taken from the field nearby, a there was a big hole to fill back in. Thanks, Keith for doing it with your Bobcat- that saved me about 2 weeks of nonstop shoveling!

Monday, October 01, 2007


Sunday, September 30, 2007
If time is money, this is becoming very expensive real estate. Time to finish the barn roof. We started by installing the overhang on the gable ends. 2X4 "lookouts" have to be cut, notched, and spaced just right to mate with the sheathing that will eventually cover them. Since the fascia boards must follow the curve of the arched roof, they had to be custom-made by tracing and cutting a curved shape out of larger boards. Slow work!
 With the overhang finished, we started putting up sheets of 1/2" plywood, which were clamped and nailed to conform to the curved roof.

 With the overhang finished, we started putting up sheets of 1/2" plywood, which were clamped and nailed to conform to the curved roof.

Wednesday, September 26, 2007
With my dad back from his fishing trip, I had an extra set of hands to help bend the last piece of sheathing around the silo wall, to close it off over the walkway roofline I built last weekend. This last piece proved to be the toughest, since we were working from a difficult spot. Using an assortment of clamps, screws and stubbornness, we go in place.
 We also put on the last of the foamboard insulation, and finished the overhang of the barn roof where it meets the silo. We now have a watertight silo (except for the gaping holes where the windows will eventually go!).

 We also put on the last of the foamboard insulation, and finished the overhang of the barn roof where it meets the silo. We now have a watertight silo (except for the gaping holes where the windows will eventually go!).

Monday, September 24, 2007
With the silo up and the barn roof trusses in place, it was time to connect the two structures with a walkway on the second floor. I've been thinking about this part of the job for months- I hate to admit how many hours have passed by as I stared at a blank piece of graph paper, unable to put the pieces together. I wanted to make the short roof of the walkway in the same shape as the barn roof, which means I'd be building a scaled-down arched roof connected to the round silo wall on one end and projecting through the arched barn roof on the other end. How do you connect two curves with a curve?
When working as an engineer, I could plop down in front of the CAD system and generate a 3-dimension model of what I wanted. A few keystrokes later, the printer would be spewing out drawings of all the component parts, dimensioned to the nearest thousandth-of-an-inch. Those were the days! Now there is no cheating. IBM is not here to bail me out- I've got a pile of tools, a larger pile of lumber, and a mushy brain.
The silo stands less than two feet from the barn roof. Two feet! How hard can this be? I've had a year to figure this out and hadn't made an inch. My last resort strategy of "staring at it" finally paid off and I came up with a brilliant idea- take away one of the curves (without it showing, of course). So I started by building a mini-truss using 2X6 segments sandwiched between two pieces of plywood (I scaled down the dimensions of the barn roof trusses when cutting the plywood so that the walkway roof would have the same shape as the barn). My mini-truss would define the curved profile of the walkway roof and give me a flat surface to attach the other framing members to.
 Next, I mounted my mini-truss on top of the barn wall, placing it in just the right spot so that the remaining silo wall studs could be rested on top of it (This will conceal the flat truss once all the remaining framing is installed). With that done, I was able to complete the walkway roof framing by spanning the gap with 2x4s laid out to follow my arched truss profile. On the barn roof side, these short 'rafters' were attached to various nailers that I put in the opening of the walkway.
 Next, I mounted my mini-truss on top of the barn wall, placing it in just the right spot so that the remaining silo wall studs could be rested on top of it (This will conceal the flat truss once all the remaining framing is installed). With that done, I was able to complete the walkway roof framing by spanning the gap with 2x4s laid out to follow my arched truss profile. On the barn roof side, these short 'rafters' were attached to various nailers that I put in the opening of the walkway.

Next, I covered my handiwork with 2 layers of 1/4 inch plywood that had been soaked overnight to facilitate the extreme bending required. I glued the second layer to the first, and secured them with screws to the roof. Finally, I fininished the overhead studs of the curved silo wall by notching them out to fit over the walkway roof.
 That wasn't so bad, after all. To think I lost so much sleep over it!
Thursday, September 20, 2007
What a great coffee shop
We just added a new link - if you are ever in the area this is a must stop. Big Timber is in Virginia, they have been here for just over a year and they have been our "office" since they opened. Drinks are great, the people are terrific, they have wireless internet and they are doing their part to encourage sustainable retailing (how many coffee shops compost their coffee grounds?).
"Thanks" Big Timber for housing us!
Lisa and Shawn
Taking shape.

 Details, details, details. Over the past several days, we dressed the barn and silo with a skin of rigid foamboard to block any thermal bridging through the framing studs during the cold Minnesota winters. Once we get the roof done, the interior will be sprayed with expanding foam insulation.
We also installed the overhanging roof 'kickers', leaving the rafter tails exposed to give it a barn look. Everything is being scaled from the dimensions of the old barn we deconstructed as well as the other barn that still stands nearby. With my dad leaving for a fishing trip, I have the next several days to figure out how to frame the 2nd story entryway that connects the barn roof to the silo....
Details, details, details. Over the past several days, we dressed the barn and silo with a skin of rigid foamboard to block any thermal bridging through the framing studs during the cold Minnesota winters. Once we get the roof done, the interior will be sprayed with expanding foam insulation.
We also installed the overhanging roof 'kickers', leaving the rafter tails exposed to give it a barn look. Everything is being scaled from the dimensions of the old barn we deconstructed as well as the other barn that still stands nearby. With my dad leaving for a fishing trip, I have the next several days to figure out how to frame the 2nd story entryway that connects the barn roof to the silo....
Wednesday, September 19, 2007
What's happening here?


Tuesday, September 11, 2007
Capping it off...barely.
 Glen had a 6 foot extension welded onto his boom to get the reach we needed for this lift. It wasn't enough. So he added another few feet onto the end, and we all hoped it would do the trick. After securing the dome to the boom with tie straps, up it went.
 and up...
 ...and up
 ...and up!
 We barely had enough reach to set it place. But barely is good enough. Once it was on top of the wall, we pulled out the timbers with pry bars then moved it into center and lag-screwed the roof ring to the wall ring. Thank you, Glen- you are the master!
Subscribe to:
Posts (Atom)