Friday, November 28, 2008

Yankee Ingenuity

Over the course of the last century, A family of 13 developed the farmstead that Lisa and I now call home. Only a few of the siblings are still alive today, and we are fortunate to have gotten to know them. Last year, one of the daughters (now almost 90 years old) shared some of her photos showing life on the farm. One of my favorites is this shot of the sawmill they built on the property, which was used to mill all the wood for the original barn. The description on the back of this photo simply stated, "Yankee Ingenuity". The summer house in the background still stands today, now hidden in a grove of trees about 100 feet behind the barn. A couple years ago, my dad and I bought a small sawmill and have used it to turn dying trees into useful lumber rather than the usual firewood. A few weeks ago, we set it up next to the new barn so I can start reincarnating the 70 year-old barn timbers into their new forms (posts, beams, kitchen cabinets, flooring, tabletops, doors, stairs, furniture and trim!). Our sawmill is setup only about 50 feet from where the old one had been. My dad also borrowed me his bench planer, so along with my table saw and router I am now setup to produce just about anything I could possibly need to finish the project...Green Gate Lumber Company is born!

Wednesday, November 19, 2008

Painting party

The family came over for a day of volunteer painting. We coated all the drywall with AFM HPV Primecoat to provide the code-required vapor retarder and act as a basecoat for the Bioshield Clay Paint that will go on next. It's starting to look like a home! THANK YOU for the help, everyone!

Sunday, November 16, 2008

Heat on!

Someday, we will have a central heating system (perhaps solar, geothermal, or a wood pellet boiler) that feeds hot water to the barn, house and any other buildings we have by then. But that 'someday' is a long time from today, and it is getting cold outside. So I bought a electric micro boiler and related plumbing to put together a heating system for our in-floor hydronics. Midway through the assembly process, my workspace looked like this: I clamped all the plumbing components to a board that was screwed to the wall of the utility closet, directly over the stub-outs of the in-floor hydronic tubes. I also added two branch lines to feed the upper floor bedrooms and bathroom this winter. The system was fired up yesterday (surprisingly, leak-free!) and is slowly pumping heat into the cold concrete floor...

Monday, November 03, 2008

The New White House (just in time for election day!)

Since our deconstruction of the White House left the well casing exposed, I needed to make something to cover it up before winter. It only needed to be about the size of a doghouse- just enough to cover the well pipe and provide shelter for the pump's electrical control. I was able to build a framework using lumber scraps that were salvaged from shipping pallets (got them from the local lumberyard). I dressed it up with leftover barn siding, and covered the removable roof with the leftover metal shingles.
Despite it's rich and noble history, the old White House had seen better days. It was too large and full of holes. It no longer fit our needs and was little more than a source of embarrassment when anyone looked our way. The new White House is a much better fit for us. It is small, efficient, and respectable. It fits in with the big picture here at Green Gate, a fine replacement to the old White House. And of course, no lumber died to make our new White House!

Sunday, November 02, 2008

More of the same.

Using the same raw materials as before, I continued the landscaping around the raised bed gardens on the back side of the barn. Sorry, we harvested all the kale, lettuces, mustard greens, radishes and carrots before the photo was taken.

Saturday, October 18, 2008

Recycled landscaping.

Not wanting to waste resources for the landscaping, I came up with a design that used as many local and recycled materials as possible. Starting with the entryway, I built a platform out of treated lumber (leftover from the barn framing) and covered it with old concrete slabs that we unearthed during the site excavation last year. The platform was skirted with more of the old bricks from the original barn. Next I dug a curved pathway leading around the silo, and partially filled it with 'fines' from the nearby iron mining operations (I believe it is created during the blasting operations, but not sure). Then I finished the pathway using Urbanite (concrete pieces from old sidewalks) that I've been collecting over the summer from various places. The spaces between the 'stones' were filled with more of the mining sand. Due to the irregular thickness and shapes of the urbanite, it took a tremendous amount of time to build it, but the end result has a nice look. Finally, the ground was covered with a layer of wood chips that came from the city work crews (they run the branches of cleared trees through a wood chipper, then haul them to the burn pile). Other than the roll of landscaping fabric that went under the mulch, everything for this project has been recycled and locally-collected. I figured that I used about 2 cubic yards of recycled urbanite to make this pathway, which helps to offset the 15 cubic yards of concrete required to pour the barn slab last year. The ground will remain pervious and we won't have any more grass to mow than we did before. In the spring, we can plant some flowers and schrubs in the mulched area, but for now this will have to do (winter is coming!).

Wednesday, October 15, 2008

Honey, where'd the towels go?

Since I was determined to use 1/2" material in the upper story of the silo, my final drywall bending challenge was the most difficult. To get the radius just right, and keep the sheet from breaking, I built a form out of leftover drywall and lumber scraps. Then I robbed the house of several bath towels and used them to saturate the drywall sheets with water. After sitting for an hour or so, they easily sank into the shape of the form. Next, I screwed some crossmembers into the form to hold the drywall in place while it dried.
A perfect fit...now that I've become an expert at this, I should never need to do it again.

Almost airtight.

Because the barn was too tight to produce accurate readings when they were here the first time, Minnesota Power returned to complete the air infiltration testing with a more precise blower door assembly- the results were as good as we could've hoped for. The magic number measured in this test is referred to as CFM50, which represent the amount of air leaking through all the gaps in the building when it is under a negative pressure of 50 pascals. The smaller the number, the better. Most houses today, being of older stock built before we knew much about air sealing, are very leaky, so CFM50 values of 1.0 or larger are common. A "Code" house built today should be .50 or less. To meet the minimum Energy Star requirements, we needed to be .25 or better. The more stringent Energy Star Tier III requirement is .15 or better. To satisfy the even stricter PassiveHaus standards (arguably the most stringent energy-efficient building standards on the planet), the barn's CFM50 would need to be under .08. That said, I was thrilled when our building measured .05 in this test- one of the tightest buildings they have ever measured...we did it! Since the CFM50 value represents the air infiltration per square foot of building size (in other words, the barn was .05 cubic feet per minute airflow per square foot at 50 Pascals pressure), it can then be converted to the ACH50 (Air Changes per Hour) number, which takes into account the total size of the building. This number represents how often the air is exchanged through the building due to uncontrolled leakage. Obviously, when you are trying to conserve precious heated air in our brutally-cold winter climate, the lower the number the better. the ACH50 value for the barn was 0.4, so we bettered the PassivHaus requirement of 0.6 ACH by 33%. This is exponentially better than many of the older homes in this area, and a substantial improvement over even the well-built new homes today. So what does all this math mean? Minimal heating system requirements, low heating costs, and a comfortable indoor environment...we'll take it.

Friday, October 03, 2008

Harvesting the rain.

I spent the last couple of days working on our rainwater collection system- a great Spring project that happens to be about 5 months behind schedule- just in time for freeze-up. The big delay was finishing the silo exterior so that the rain gutters could be installed. Fitting the gutters around the silo proved to be a challenge- nothing seems to come easy in the life of a bad-boy barn builder. A couple months ago, while prepping the silo for stucco, I needed to find a way to divert the water away from the roof-wall interface and keep it from working its way under the stucco. After pondering it for quite awhile, I modified a section downspout and attached it to the silo wall. Then I lapped the step flashing, housewrap and foamboard over the top of diverter piece to make it waterproof. Once the stucco was applied and the scaffolding moved out of the way, I was finally able to install the gutters and downspouts, which look like this: Now how to collect the rainwater? Actually, collecting the water is the easy part- the problem is dealing with our 6 months of freezing weather that has me worried. Usually I can find alot of useful problem-solving information via our good friend Google, so I spent several sessions searching for examples of rainwater cachment in cold climates. No luck. The only suggestion I came across was to "drain and remove the rain barrel in the fall." The system I have designed aims to collect and store 100% of the available rainwater, which means we'll have ALOT of barrels by the time this is all done. Removing them all at the end of each season would be a nightmare- not just the work, but also the logistics of storage and dealing with downspout extensions, etc. Call me lazy, but I want to make a system that can stay in place year round. So, without any good examples to work from, I'm just going to experiment. Using recycled plastic barrels that we repainted to match the barn, I started by cutting a hole in the lid and covering it with window screen (held in place using a metal stovepipe flange). I terminated the downspout directly over the barrel here.
Each barrel will sit on a stand to keep the collected water high enough for gravity-feeding to all the gardens. The stand also gives me room for the plumbing connections below the barrel. I drilled a hole in the bottom of the barrel and threaded a 2" fitting in place. Using PVC fittings, I installed a "tee" leading to a faucet that I mounted off the front of the stand, then below that a shutoff valve before the pipe goes underground. Below grade, I transitioned to ABS pipe, which will continue around the perimeter of the barn and connect all of the rain barrels in series. By maintaining the same height across all of the barrels in the system, they should fill equally regardless of where the water is coming from...
With the first two barrels installed, I decided to quit for the season. I can drain the underground line and close the hand valve to keep them from re-filling during the winter. I plan to remove the hose from the tee fitting so that the barrel can self-drain should it rain anymore before winter. I'm not sure what will happen during the snow season- will melting snow from the roof fill the barrels with water, causing them to freeze and rupture? Or will they survive here at the North Pole? I'm not sure. Any suggestions????

Monday, September 22, 2008

Time for a Silobration

As (bad) luck would have it, I was ready to start the stucco job just as the monsoon season arrived in northern Minnesota. It seemed to be raining- or threatening to do so every day, so I decided not to fight it and took the time to cover the entire silo with a big giant tarp. Way to be proactive for once, Self.

Over the course of two days, I applied the cement basecoat of Parex to the walls. Is is basically troweled onto the EPS foamboard in a thin layer, covered with a reinforcing mesh, then troweled again to embed the mesh in the basecoat. After the basecoat cured, Keith came over and helped trowel on the finish coat of Parex, which is like a thick gritty paint. This layer went on much faster, and we were done in only a few hours this time.

After another day of touch-up work, caulking windows, and installing the vents, I was FINALLY ready to climb down the ladder for the last time. It's been almost 2 years since I sketched out this crazy idea on some graph paper, and about a year since I first buckled up the tool belt and started building the big upside-down test tube. No doubt there have been several hundred (if not more) labor hours invested and likely a hundred more spent lying awake at night wondering how to actually finish it. As I started to disassemble the scaffolding, a friend stopped over and the first words out of his mouth were, "Now do you know why people make square buildings?" I think I get it...

Sunday, September 07, 2008

The pot of gold?

After a day of rain showers, we got this.

The Silo.

The last task before the stucco goes on the silo was to install a 'skirt' around the base of the roof to divert the rainwater out and away from the wall. After spending several days talking to every sheet-metal fabricator within a 60 mile radius of The North Pole, Minnesota, I finally gave up on the hopes of getting something custom formed to fit the curved wall. So, on to my backup plan. Using the leftover flashing from the milkhouse roof, I formed my own 'curved' skirt by lapping short pieces and screwing them together. I also added several vents around the perimeter to flush out the airspace above the 2nd floor ceiling of the silo. It's not as pretty as I wanted, but when you are standing on the ground, 20 feet below, it looks just fine. The silo is now ready for stucco!

Bending drywall- 2nd attempt

To finish the arched ceiling of the barn meant that I'd have to force drywall to bend beyond its theoretical limits. Since my previous method of using 2 layers of 1/4" drywall added alot of cost and time to the job, I was determined to find a better way. So I fashioned a very simple station to elevate and wet the concave face of the sheet using a couple of water-soaked towels. After sitting for an hour or so, the sheet turned into a noodle and slowly sagged to the floor. I removed the towels and let the fan blow on it for another hour, which "set" the sheet into its new taco shape. Since this seemed to work so well, I cut and formed all 14 sheets needed for the ceiling so they were ready to go up when help arrived. My dad came over and we double-teamed the installation. With the sheets pre-curved, we just needed to screw down a couple of cross bars to pull them into the exact shape of the ceiling, then secure with ALOT of drywall screws. The last sheet ready to go up. Now if I could just find a crew to tape and mud all these seams!

Thursday, August 21, 2008

Pictures from above

I have a co-worker who is an avid pilot. She and her husband fly and restore vintage planes. It is quite amazing what they do and how many hours they log flying. I had mentioned taking aerial photos and to my delight she agreed to fly over our property. So, one early morning "Yellow-Bird" came flying overhead. These are a few of the photos they took. We are hoping to use them in advertising for Green Gate. Aren't they great? Thank you Yellow Bird and her companions!!!

Wednesday, August 20, 2008

Judgement Day.

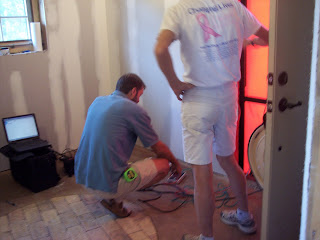
In addition to the LEED certification program, we also enrolled our project in the Triple E Construction/Energy Star program through our utility provider Minnesota Power. This program rewards energy efficient construction techniques by verifying the thermal performance of the house and awarding cash rebates when certain levels are achieved. To verify the energy efficiency of the barn, a blower-door test was conducted. This procedure consists of sealing off the doorway with an expandable frame and fan assembly that depressurizes the building by blowing air out of the house. As the building is depressurized, air will rush in through the various "leaks" in the walls, penetrations, windows, etc. Sensors on the blower unit measure the amount of airflow required to achieve a given pressure level- the "tighter" the house, the lower the flow. While the blower door test was running, I got to walk around with the thermal imaging camera, which displays the temperature variation in the surfaces of the building. If any air was finding its way into the house, it would show up as a "hotspot" on the camera. Pretty slick tool! I have been anxiously awaiting this test for months, and can now say the results were even better than I had hoped for. The little white barn was super tight- the air infiltration was so low that we could not get an accurate reading with the blower door test! He will need to come back to retest it with a more precise blower setup before we can know for sure, but for now it looks like we may be building the most energy efficient "barn" in the world...and a rebate check is on the way (finally, greenbuilding pays!).

Tuesday, August 19, 2008

New uses for old trees.

In keeping with the circular theme of the project, we found a tree trunk table base for the silo's dining room. This cedar piece was made by Ryan's Rustic Railings in Orr, MN (check out their work, wow!). Ordinarily, it would've been too expensive for our budget, but we found this one for sale on Craigslist and picked it up for a deal. It came with a tabletop that was too small for our needs, so I will build a new one from the wood salvaged from the old barn...

Wednesday, August 13, 2008

Is this a funnel cloud?

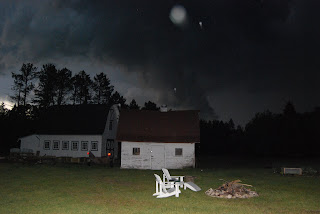
Okay, weather aficionado's. Is this a funnel cloud? The day after I took this picture, I heard a funnel cloud was spotted in the Aurora area. Even if it's not a funnel cloud, it was pretty amazing. I was taking pictures and the cloud just dropped.

Kayaking

It's not all work on the Homestead. Sometimes we play. Shawn's sister and niece spent the week. One day we decided to go kayaking. Instead of having to load the boats on cars, we were able to walk them from the house to the lake. (Thanks to Shawn's kayak carrier, one person can tow our kayak). It's pretty slick.

Tuesday, August 12, 2008

Who needs technology?

We were preparing to start the insulation when we realized that our 2-way radios were not working. Okay, we thought we could do this without radios. Shawn was on the second story of the barn and I was outside on ground level. The first day, we tried the shouting method. With the blower running, we could not hear each other. So, then I would either turn off the blower and shout to see if he was finished or I would walk into the barn, up the ladder and ask "Are you done yet?". This got to be a tad bit tedious. Luckily the first day we had a room for error. If I didn't turn the blower off in time, the cellulous would just go to another area that needed to be filled. On the second day, we were getting to the end of each "pocket". There wasn't much room for error. I guess the worst that could happen would be that there would be cellulose everywhere. We went looking for a battery for the 2-way radios. Couldn't find one. Shawn had a great idea of using a string. He would pull it when he was finished. I was worried that if I was doing something like loading the blower, I wouldn't see it move. So, I added an accessory and it worked beautifully! My family goes to the state fair every year and plays the "frog game". Every year we get stuffed frogs that hang around the house. So, I have finally found a good use for our frog. After a hard days work, Frog now has a place of honor in the barn. He is the Green gate official mascot. Really, who needs 2-way radios?

Monday, August 11, 2008

Super-insulated? Definitely.

The trusses were filled with 10+ inches of Icynene spray foam last winter, giving the barn an airtight seal and exceeding code requirements for insulation levels. But there was still plenty of space left in the trusses to go the extra yard with insulation, so we decided to do just that.

First, I stapled up some Insulweb netting to the bottom cord of the trusses, which will contain the insulation before drywall is installed. Then I screwed a double layer of 3/8" plywood strips in place to give the segmented trusses a smooth, radiused contour for the drywall to attach to.

With the prep work done, I cleverly convinced Lisa that being in the driver's seat of an insulation blowing machine would be "fun", and we filled the trusses with Greenfiber cellulose insulation.

Lisa kept the hopper filled and I worked the receiving end of the hose- after 2 days of "fun" and about $500 in materials (less than some people's monthly heating bill in this part of the country), we had packed 1600lbs of recycled newspaper into the ceiling. This puts the R-value of the ceiling at R50 (near the bottom of the trusses) to over R100 (at the peak).