Tuesday, July 13, 2010

Hay loft trim out.

Last week, I got back to the interior finish work in the barn. The goal is to start on the upper floor (bedrooms and bathroom) and work my way down until everything is done. Putting up trim is a good sign, as it must mean the project is nearing completion. However, I quickly found out that curved walls + arched roofs = painstakingly slow progress, and I spent a solid week milling, finishing and installing all of the bedroom trim. The hayloft area is separated into two 'semi-private' bedrooms by a partition wall, so in addition to the baseboard trim, I had to cap the top of the wall and trim that as well. The curved sections of the wall were pretty tricky and required a lot of clamps and screws to make it work: But the finished product turned out pretty good, considering my limited skills. Finish carpentry is not my strong point.
The baseboard trim was also tedious, as I had to work my way around each of the vertical timbers. In all, it took around 125 pieces of trim, complete with curves and custom miter cuts, to finish the hayloft...yes, I'm really good at creating work for myself!

Tuesday, June 15, 2010

Ground zero.

Between rain storms last week (why do the monsoons come when I need to be on top of a building!?), I plugged away on the garage to remove all the roof and wall sheathing.

Then cut the rafters out one by one and threw them to the ground. With little meat left holding it up, I tied a chain around the center support and pulled the the works down with my truck.

All that remains is to pull nails from all the salvageable lumber (which, thankfully is just about all of it) and stack it up to dry. Feels good to be back on solid ground again!

Friday, June 11, 2010

Compost happens.

Soil quality appears to be one of the key factors in our struggle to become successful organic gardeners, and it seems as though the chickens are a big help in this area. I added last year's 'droppings' to the soil in some of our raised bed gardens and covered it with fresh topsoil before planting this spring and the results are looking great. Spinach has never flourished here- it usually comes up 'stalky' and goes to seed before the leaves have a chance to develop into anything substantial. But we both love spinach and so we keep trying. This year, our first crop is looking better than ever: ...and the kale has already grown tall enough to push against the lid of the cold frame:
To speed up the composting process, I've been tossing our weeds and clippings directly into the chicken pen- they go after it like a school of piranhas, and can devour a wheelbarrow-full of stuff in a day. This fall, I can shovel out their handiwork and turn it into the gardens. We also got got four more little 'composters' this week- Buff Orpington pullets. Here they are spending their days eating, sleeping and pooping in a little pen we set up in our office.
And since we haven't had much success with our compost bins, I decided to try building a tumbler to speed up the process. After perusing some examples of DIY compost tumblers at the Instructables site, I made one using an extra plastic barrel leftover from the rainwater project and a support frame built from barn timbers. The barrel turns on little plastic casters mounted to the frame. I made the frame open on the front side, and high enough so that the contents could be dumped directly into a wheelbarrow.
I cut out a door in the side of the barrel with a jigsaw, and secured it to the barrel with a piano hinge and some bolt latches.

Here it is after filling with some partially-composted scraps from our bins, weeds, grass clippings, etc.

If it works as planned, we should have usable compost in a few weeks...I'll believe it when I see it.

Wednesday, June 09, 2010

Loading the Evergreen

I spent a few days building some shelving in the Evergreen, then transferring everything over from the garage. Compared to the garage (think dirt floor, rotted foundation, and a plethora of animals/insects/birds calling it 'home'), the storage container feels like the penthouse suite of mancaves by comparison. It is solid, dry, and does NOT reek of bat guano...ahhh, the good life!With the garage emptied out, demo ensued on the structure. The skin (siding, shingles and tarpaper) came off in a couple of days, with the help of Lisa and my parents (who thankfully, refuse to act their age and are more than happy to climb up on the roof and tear off shingles).
Other than the rotted wood around the base, everything is solid and will no doubt be useful for upcoming projects.

Friday, June 04, 2010

Landscaping and "The Evergreen".

The unusually warm and dry spring provided an opportunity to get an early start on this year's outdoor projects. On the agenda is to remove the concrete foundation from the 2nd barn we deconstructed last year, move the fire pit, build some nice pathways between the remaining buildings, install some 'temporary' storage (and I use that term loosely), and finally deconstruct the dilapitated garage structure. Here's what the situation looked like in April: We hired Dan the landscaper for a day to do the bullwork with his Bobcat, and I helped out with the ground work and generally leaned on a shovel for most of the time.
We decided to dig a hole under the foundation and bury the old concrete on-site, rather than adding it to the local landfill. It was a pleasure to watch him work, tossing around big concrete boulders with surgeon-like precision...in a few hours the site was leveled off as if nothing had even been there.
I also had him skim away the sod and topsoil to form pathways across the yard. We piled up the topsoil for later use in the gardens, then replaced the material with gravel fill dug out of the foundation site. Then he drove away with his big machines- with a tear in my eye, I set out to finish the rest with a shovel, wheelbarrow, and several tons of stone.
But first, we had a 40 foot steel shipping container delivered (one benefit of America's pathetic trade deficit is an over-abundance of these huge shipping containers...so a big THANK YOU to Walmart for ours). It was plopped down behind the soon-to-be-deconstructed garage and in a matter of 15 minutes we had a 300 square foot water-tight, critter-proof building! This will satisfy our storage/workshop needs, and provide a solid surface for mounting the solar thermal panels this summer. Our container had the fitting "Evergreen" logo on it, so we named it "The Evergreen" (Lisa gave it an alternate name- the "Tunnel of Death", after we quickly discovered that it could double as a pizza oven inside on a hot, sunny day!).
Back to dirty work, I started laying down field stone around the house and along the pathways, then infilled with mulch and pea-rock.
One of the pathways passes by the entry doors to the shipping container, so I built up a little ramp for easy access. I also moved the pathway light posts to the new pathways and buried the low-voltage lines under the fieldstones. Here's a pic of the almost-finished paths between house, barn and shipping container:
Another shot, taken from the barn side of the yard:

Saturday, May 29, 2010

A Little Break

, We took a vacation to Whitefish, MT and Glacier National Park. We had a great time. It was beautiful the whole time we were there. Perfect for hiking, biking and just hanging out. The week before we got there, they had just gotten 3-4 feet of snow in Glacier. That made some of the hiking difficult and a lot of the park was still closed, but we found some great trails and saw some great sights.
Hiking in the snow to Avalanche Lake.
We found some trails without snow. And some snow the higher you went. That's Shawn looking
for the trail. We were on the Whitefish Ski Resort hiking trail
and wanted to get to get to the top. No such luck.
Back in Glacier. We wanted to see as much as we could. The Going-to-the-Sun road was closed to cars at Avalanche Lake. But, open to bikes. We took out the bikes and went up.Shawn made it a little higher up than I did. Near the pass, until the snow on the road made him turn around. It was beautiful.
It was a great relaxing vacation. Time to gear up and get back to work.

Thursday, May 27, 2010

The Living Green Expo

We participated in our first Expo the first weekend in May. We went to the Living Green Expo in St. Paul. This is the largest Green Expo in MN. It is the Expo's 12th year and it had a little over 250 exhibitors. Exhibitors came from all parts of the state. There was a little something for everyone from green architects, organic cleaners, re-used rain barrels, various environmental causes and gigantic sunflowers made from old trucks (bought one for my dad). It was a great experience to be part of such a great event. Shawn spent hours making the booth. The table was made from our timbers for the legs and one of our slabs hand cut by Shawn. The picture frames, benches and larger frame were all made from wood from the old barn. The glass for the pictures came from old windows that were left in the barn. My cousin, Linda was nice enough to paint our Green Gate sign for us. Which I must say, turned out exactly how we wanted it. Thank you Linda.
That's us having a super fun time. We met some great people, had some good conversations, saw some old friends, and had super people in the booths around us. All contributed to make the weekend very successful.

Monday, May 24, 2010

Solar Sundays- Part IV

Okay, my "Solar Sunday" idea didn't work out so well. Other more pressing projects got in the way, along with seminars, expos, holidays and a great vacation trip to Glacier. Once I got back on it, Spring had passed, the days were getting hot and we were already eating salad greens with dinner. I decided to add another dump loop to the solar system to avoid the risk of overheating the raised beds. For this, I dug 40 feet of trench, put down a loop of pex, and covered it with topsoil. Then I extended the main line to the first two of our four raised bed gardens. The dump loop and each of the raised bed loops have their own shutoff valve so I can direct the heat wherever it is needed.
On a steamy day with the temp in the high 80s, I finally charged the system with fluid and flipped the switch- the heat is pumping through the soil and everything seems to be working well so far!

Monday, April 26, 2010

Lincoln Logs for grown-ups.

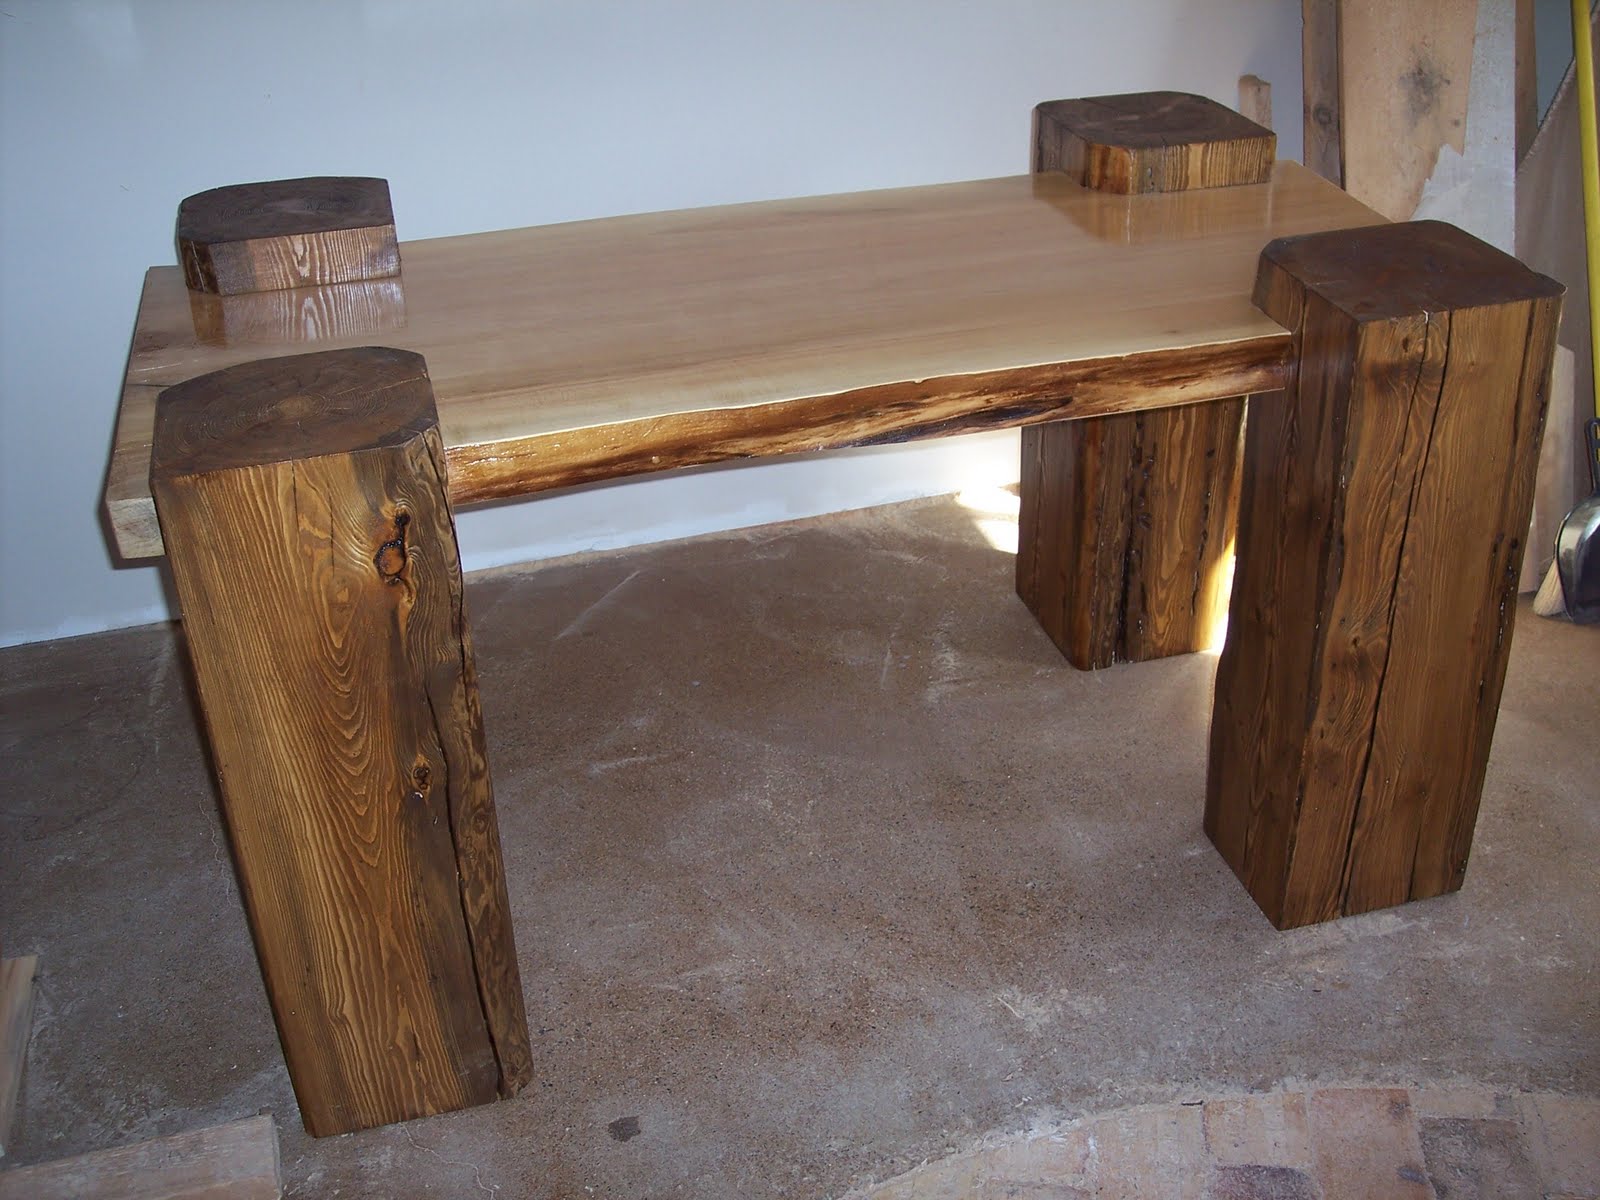
We'll be exhibiting at the Living Green Expo In St. Paul this weekend and I wanted to make some unique (and sustainable) eye candy for our booth. I decided to build a table, working with one of our maple slabs cut with the Alaskan mill and a reclaimed timber. Here's the rough slab after being kiln dried.

I don't have the proper tools for working with material this large, so it took a lot of hours with the planer and sander to smooth it up. After about 10 coats of shellac, it looked pretty good.

I cut mortises in the table top and legs to mate them together like the Lincoln Logs we played with as kids. The fit was tight enough that the table is surprising stable without any fasteners. Here's the finished product, ready for a trip to the big city.

If you're in St. Paul this weekend, come check out the expo at the state fairgrounds, and stop by to say "hi" if you do!

Wednesday, April 14, 2010

If you're in northern Minnesota this weekend, come check out our 2nd annual Iron Range Earth Fest in Mountain Iron on Saturday. Lots of exhibitors, vendors, and presentations on a variety of sustainability topics- should be a blast!

Monday, April 12, 2010

Solar Sunday- Part III

It's been a couple weeks since working on the solar experiment, as other projects came up. I built some simple wood brackets to fasten the collector to the south wall of our rainwater tank 'shed'. I had planned to mount the pumping station outside on the west wall of the shed, but decided at the last minute to instead put it inside, sheltered from the rain. Access is obviously more difficult (I have to crawl underneath and through a hatch in the raised floor to get at it!), but it'll work for now. The outlet end of the collector passes through the wall to the pumping station- I made the connection using a flexible water heater connector. The inlet pipe to the collector (bottom right) also has a flexible connector. I have gauges at both the inlet and outlet ends of the collector so I can measure the temperature gain, and knowing the pump flow rate, calculate the BTU output of the system. We're using this collector to pump heat through tubing lines buried under our raised bed gardens. All that's left is to run the supply and return lines to the gardens and it should be ready to make heat...maybe this week :)

Thursday, April 01, 2010

Homegrown furniture.

I don't yet have the skills to build furniture, but i'm not too bad at timber framing and we still have piles of barn timbers...so I upcycled them into this post-and-beam bed frame. The joints are all mortise and tenon and it is quite solid, but I decided to add metal brackets on the inside corners for good measure- so total project cost was about $5!