Wednesday, August 20, 2008

Judgement Day.

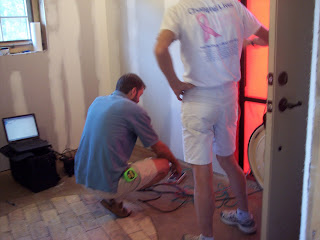
In addition to the LEED certification program, we also enrolled our project in the Triple E Construction/Energy Star program through our utility provider Minnesota Power. This program rewards energy efficient construction techniques by verifying the thermal performance of the house and awarding cash rebates when certain levels are achieved. To verify the energy efficiency of the barn, a blower-door test was conducted. This procedure consists of sealing off the doorway with an expandable frame and fan assembly that depressurizes the building by blowing air out of the house. As the building is depressurized, air will rush in through the various "leaks" in the walls, penetrations, windows, etc. Sensors on the blower unit measure the amount of airflow required to achieve a given pressure level- the "tighter" the house, the lower the flow. While the blower door test was running, I got to walk around with the thermal imaging camera, which displays the temperature variation in the surfaces of the building. If any air was finding its way into the house, it would show up as a "hotspot" on the camera. Pretty slick tool! I have been anxiously awaiting this test for months, and can now say the results were even better than I had hoped for. The little white barn was super tight- the air infiltration was so low that we could not get an accurate reading with the blower door test! He will need to come back to retest it with a more precise blower setup before we can know for sure, but for now it looks like we may be building the most energy efficient "barn" in the world...and a rebate check is on the way (finally, greenbuilding pays!).

Tuesday, August 19, 2008

New uses for old trees.

In keeping with the circular theme of the project, we found a tree trunk table base for the silo's dining room. This cedar piece was made by Ryan's Rustic Railings in Orr, MN (check out their work, wow!). Ordinarily, it would've been too expensive for our budget, but we found this one for sale on Craigslist and picked it up for a deal. It came with a tabletop that was too small for our needs, so I will build a new one from the wood salvaged from the old barn...

Wednesday, August 13, 2008

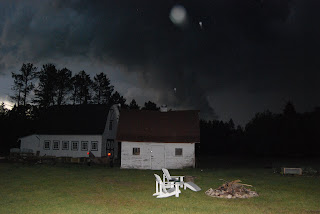
Is this a funnel cloud?

Okay, weather aficionado's. Is this a funnel cloud? The day after I took this picture, I heard a funnel cloud was spotted in the Aurora area. Even if it's not a funnel cloud, it was pretty amazing. I was taking pictures and the cloud just dropped.

Kayaking

It's not all work on the Homestead. Sometimes we play. Shawn's sister and niece spent the week. One day we decided to go kayaking. Instead of having to load the boats on cars, we were able to walk them from the house to the lake. (Thanks to Shawn's kayak carrier, one person can tow our kayak). It's pretty slick.

Tuesday, August 12, 2008

Who needs technology?

We were preparing to start the insulation when we realized that our 2-way radios were not working. Okay, we thought we could do this without radios. Shawn was on the second story of the barn and I was outside on ground level. The first day, we tried the shouting method. With the blower running, we could not hear each other. So, then I would either turn off the blower and shout to see if he was finished or I would walk into the barn, up the ladder and ask "Are you done yet?". This got to be a tad bit tedious. Luckily the first day we had a room for error. If I didn't turn the blower off in time, the cellulous would just go to another area that needed to be filled. On the second day, we were getting to the end of each "pocket". There wasn't much room for error. I guess the worst that could happen would be that there would be cellulose everywhere. We went looking for a battery for the 2-way radios. Couldn't find one. Shawn had a great idea of using a string. He would pull it when he was finished. I was worried that if I was doing something like loading the blower, I wouldn't see it move. So, I added an accessory and it worked beautifully! My family goes to the state fair every year and plays the "frog game". Every year we get stuffed frogs that hang around the house. So, I have finally found a good use for our frog. After a hard days work, Frog now has a place of honor in the barn. He is the Green gate official mascot. Really, who needs 2-way radios?

Monday, August 11, 2008

Super-insulated? Definitely.

The trusses were filled with 10+ inches of Icynene spray foam last winter, giving the barn an airtight seal and exceeding code requirements for insulation levels. But there was still plenty of space left in the trusses to go the extra yard with insulation, so we decided to do just that.

First, I stapled up some Insulweb netting to the bottom cord of the trusses, which will contain the insulation before drywall is installed. Then I screwed a double layer of 3/8" plywood strips in place to give the segmented trusses a smooth, radiused contour for the drywall to attach to.

With the prep work done, I cleverly convinced Lisa that being in the driver's seat of an insulation blowing machine would be "fun", and we filled the trusses with Greenfiber cellulose insulation.

Lisa kept the hopper filled and I worked the receiving end of the hose- after 2 days of "fun" and about $500 in materials (less than some people's monthly heating bill in this part of the country), we had packed 1600lbs of recycled newspaper into the ceiling. This puts the R-value of the ceiling at R50 (near the bottom of the trusses) to over R100 (at the peak).

Monday, August 04, 2008

More adventures in silo-building.

With all the flat surfaces in the barn covered with drywall, it is on to the more difficult areas. I started on the ground level of the silo, which will be dining room once finished. Because of the sharply curved wall, standard drywall wouldn't make the bend, so I went with two layers of thinner 1/4" drywall. After the entire wall was covered with the first layer, I trowed on a coating of joint compound before screwing the second layer in place. The end result was a standard 1/2" thick wall that formed a nice curve, but it took twice as much time and twice as much money to do it (ironically, 1/4" drywall costs more than 1/2" drywall, and you need twice as much!). I am rethinking how I do the upper level....

My dad came over and helped rig up the scaffolding around the silo exterior so I could prepare it for the stucco. Thanks to Keith borrowing me some of his scaffolding, we were able to circle the entire silo and tie everything together solid. I have been dreading this job all winter, but with the scaffolding so rigid, it is actually pleasant to be working up high now. The original layer of XPS foam was covered with Tyvek Stuccowrap, windows flashed (again), and then covered with 1" EPS foamboard, screwed through both layers and into the studs.

The endless salad bowl

Before filling the new garden frames with dirt, I ran ABS pipe underneath with a vertical stubout in each one. Once the rainwater collection system is finished, the pipe will gravity-feed water to the gardens.
Next, the beds were lined with 2" foamboard insulation, followed by a couple loops of PEX hydronic tubing to provide future solar heat to the plants in the spring/fall (summer only lasts about 3 months up here!). The PEX tubing enters and leaves the frame through holes I drilled on either side of the vertical black water pipe. Fortunately, I had just enough leftover foamboard and PEX tubing from the barn foundation to complete this project without needing to purchase anything...

Finally, the beds were filled with dirt and seeds were planted in July. I also built temporary covers using permeable cloth to help retain the heat and (more importantly) keep out the deer that have suceeded in eating virtually everything we planted in our other gardens.

And 3 weeks later- Voila! The endless salad bowl.

The Whitehouse

In the name of progress, we tore down a piece of history here on the farm. The shed building that has occupied a spot in the yard for probably 60 years is now gone.
Back in the 40s, the family drilled a well in the yard to bring water to the farm the easy way, likely ending a long, laborious tradition of hauling water from the river. They had somehow acquired two little buildings (probably taken from the mines or the railroad, as that seems to have been the source of most of the building materials and farm supplies back in those days) and then joined them together to form one larger structure. It was placed directly over the well, and a pump was installed inside to send the water to the main house. To keep everything from freezing in the winter months, they added a fireplace to heat the building with wood. As the story goes, the local men would congregate here in the evenings to share stories, heat, and likely a fair amount of alcohol. Apparently, the yard was filled with pickup trucks some nights, and the little pumphouse became known as "The Whitehouse", where they solved all the problems of the world.
By the time I purchased the abandoned farm in 2002, everything had been stripped out of the buildings, including the plumbing. So that first year, we installed a submersible pump in the well to eliminate the need to keep The Whitehouse warm year-round. Since then, I have been using it as a makeshift workshop and storage area for tools, bikes and barn-building supplies. With the new barn now erected next door, it has become more of an eyesore, blocking the view and the southern sun...so it the time had come to take it down.
We didn't have a need for more salvaged materials and I really didn't want to spend a couple of weeks deconstructing the old building, so I posted it on Craigslist and found a farmer who was glad to come and take it for free (he'll be reconstructing it at his place near Duluth to use for his animals). So even though it is leaving our homestead, The Whitehouse lives on...

Thursday, May 29, 2008

Urbanite= reused concrete

We need to create walkways around the buildings. Dirt paths are, well, dirty. Crushed rock or mulch are hard to deal with in the winter. Natural stone is cost-prohibitive. Concrete sidewalks are resource-intensive. But what if we could reuse pieces of old concrete sidewalks and bed them in sand like stone pavers? After finding a pile of concrete somebody had dumped along one of my running trails (it pays to be a trail runner!), I decided to find out. So I brought back two pickup loads of concrete chunks and two more of sand, then landscaped the front entry of our house to see how the "Urbanite" would look...we like it, what do you think?

Thursday, May 22, 2008

With the temperatures FINALLY warming up enough to paint again, I used some to turn the entry door into a faux barn door. Now if I could just finish the silo.

Tuesday, May 20, 2008

Horse turds, anyone?

Our friends in Aurora offered up a load of manure, so I filled up the truck. I also built a compost bin so we can start making our own good stuff for next year. With the gardens covered with a layer of fermenting horse turds, it suddenly smells like a real farm around here.

Thursday, May 15, 2008

My parents came over for a few days to hang drywall. We got most of the flatwork done, so next is the curved surfaces of the silo and barn ceiling. Good times!

Thursday, May 08, 2008

Our goal in landscaping the new barn centers around making the ground productive rather than consumptive- rather than cover the ground with turf that requires mowing, watering, and weed-killers, we'd prefer to utilize the space for growing things worthwhile. We'll plant gardens and drought-resistant plants, install pervious pathways, and collect rainwater for our irrigation needs. This week's project was gardening, or at least preparing for gardening. I built four raised bed gardens for the south side of the barn and also the stand to hold 10 rain barrels. Eventually, the rain gutters will discharge into the rain barrels and the water will be gravity fed to each of the raised beds for plant watering. But first we need rain gutters, downspouts, piping, several more rain barrels and of course dirt(!) to make all this work as planned....

Monday, April 28, 2008

With the concrete floor polished and stained, it was finally time to mortar in the brick pathway. The bricks were salvaged from the original barn when it was deconstructed a year ago. I mixed the mortar in small batches and worked my way across the barn, leveling out the bricks as I went. The seams will still need to be grouted, but for now it is good enough.

Tuesday, April 08, 2008

April fools?

We happened to be out-of-town during Minnesota's April storm, which unloaded 30+ inches of snow on us. Add to it the avalanche that fell off the roof and, well, you can see the result. Now, where did I leave the shovel?

Sunday, March 30, 2008

Rather than adding another layer of finish flooring over the slab, we decided to polish and stain the concrete itself (doesn't it make more sense to work with what we've already got?) So before the brick pathway is mortared in place, Keith was kind enough to set me up with his grinding/polishing equipment so I could get the job done. First, the floor was leveled by coarse grinding, then polished to a 200-grit finish using successively finer sanding pads in the polishing machine.

It took three days of polishing to get to this point, which doesn't look all that much different than the unpolished floor (but believe me, it is!).

Next, several samples of stain were applied in the utility room area to experiment with the color and get the shade we were looking for. Originally, I had planned to use a soy-based stain called Soycrete, but this product was not penetrating the polished floor very well during our test samples. In the end, we went with a more traditional acid stain instead. The adobe-colored stain was sprayed onto the floor, worked in with a brush, then allowed to penetrate overnight. The next day, I washed the floor with a baking soda/water solution to neutralize the reaction, then went over the surface one more time with a 220 grit final polish. Done!